collography
Collagraphy is a basic form of printmaking. In its simplest form it merely requires the application of materials to form a collage plate which can be used to print from. Many forms of printmaking require the removal of material from the plate or block such as in a lino cut or woodblock, so this additive method is quite different. With an etching, acid is used to erode away the surface of the plate. Both woodblocks and linocuts also require the cutting away of material. In a collagraph, textural material is added to the surface of the substrate or base plate although the base plate may also form an integral part of the design through peeling and scoring.
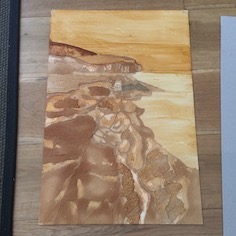
The end result of all these forms of printmaking is a plate or block covered with raised or indented areas which will hold varying amounts of ink. This ink is then transferred to the paper via pressure either through the use of a press or manual burnishing (rubbing).

How to make a collagraph plate
-
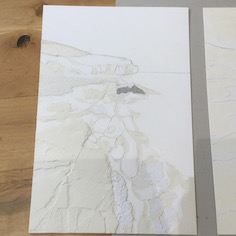
Collagraph Plate. A thin base such as mount board or card is used as a support for the applied materials, the technical name for this is the 'substrate'. Materials such as string, crumpled paper, fabric, corrugated card, salt, porridge oats, natural materials such as leaves, seed pods, grasses, can all be used - the choice is infinite. There are a few limitations such as a material which is fragile and likely to crush going through the press or one with sharp edges which might cut the blankets on the press. The most important thing to remember is that these materials need to be handled sympathetically and that selectivity is preferable to wild abandon! Choosing a few materials which work well together will always be better than a little bit of everything. As they say ‘less is more’.
-
Texture. All of the materials mentioned above have a texture. Generally speaking the smoother the material the more it will ‘resist’ or repel the ink, creating a lighter tone in your finished print. Materials with a coarse or rough surface trap more ink and therefore represent darker areas within your image. Through experimentation and experience you will learn and remember the approximate tonal values of different materials. As a guide, scrim, fabric and salt are coarse and will be your darkest areas. Glue, masking tape and tissue have smoother surfaces and come out pale or white.
-
Edges. Cut edges or strips of tape can be used to form very defined patterns. Ink is caught along the edge and can be used as part of a more linear design. Strips of interlaced tapes, some shiny, some rougher can provide an interesting motif in itself.
-
Scoring. The mount board has its own tonal value but it can also be used to create linear detail through scoring. By scoring into the board with a scalpel or craft knife, lines can be carefully hatched or roughly gouged. The quality of the line will vary depending on how the incision is made. Stripes and chequer board patterns can easily be achieved this way.
-
Resist. Glue is the ultimate resist medium. It can be smeared, swirled or painted on with great control. An entire design could be based around a painted glue motif. It is also good for highlights. Shiny papers and wax could achieve a similar result. It is best to be wary of materials with a man-made shiny finish such as foil, sellotape or stickyback plastics as they can be so shiny they resist the shellac sealant which protects the blocks. This can be problematical when inking up later.
-
Mount board. As said above, the mount board base has its own tonal value which is quite pale. However, if the top layer of the board is peeled back it reveals a fluffy underside which is very useful when creating large dark areas as this surface traps a lot of ink. Painting glue onto this fluffy surface will give you the greatest tonal contrast creating white within dark. By nibbling away into the board you can create textures within your dark area.
-
Problem-solving. Most of printmaking is about solving problems. How can I do that? How did they do that? After you have mastered the basic techniques of mark-making and material selection it is easier to start thinking like a printmaker and combine these methods to get the ‘look’ you are after.
-
Reflection. The process of ‘pulling the print’ will always reverse your image when using this technique. It may be worth considering this before starting work on your block. You may choose to trace and reverse your design at this stage so that it comes out the right way when you pull your print. Alternatively you may opt for the spontaneous approach and just ‘go for it’.
-
Sealing. So now you have your finished plate it needs to be sealed. A thin coating of shellac varnish is used to protect the collage materials from the inks and cleaning fluids. The shellac cures and hardens to give your plate more resilience which will make it more durable and last longer. Unfortunately the very nature of collagraphy and the materials used means that it is restrictive in the number of acceptable prints that can be taken before the plate begins to disintegrate. Careful inking, cleaning and general handling will help maximise this number. I regularly edition up to 30 images from one plate.